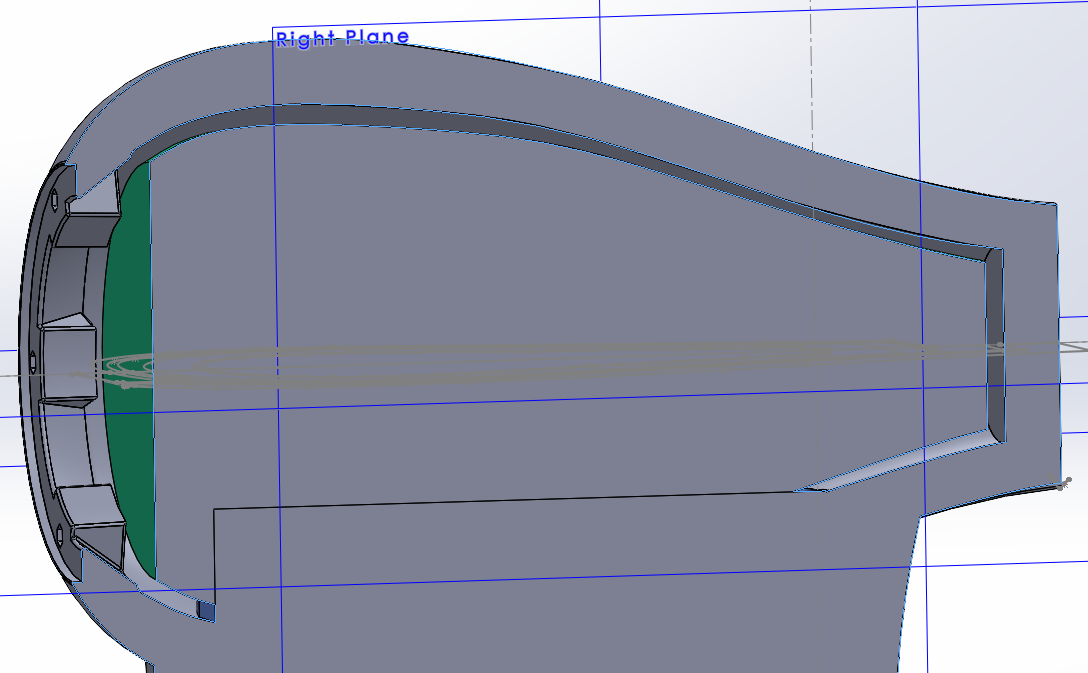
I am a very very beginner in SW, and I have an object, which has hollow part in it, where I want to create shell in there. And save that shell as another body. And the object looks like an inside of the jar, but has some sharp edges inside and many faces inside. So, what is the way to do this? Just give me a hint. Nave no luck with shell command, because the shell command does not work because of radius, offset surface also.
Screenshots attached. Painted the sharp faces in checkers, just for looks to show how the irregular part looks.
What I need to do: I need to make a “bottle” from this of specified thickness - 6mm in my case. The walls of the “bottle” are defined by ~20 different surfaces and many points. In the screenshot green object is what I need to have as an inside of the “bottle”, I painted it by hand as a sketch, just without the bottom complex part. I need to separate that red part as another solid, which is between green and the inner surface.
I just want to have a shortcut not to make it half a day job redrawing everything.
Well, you can do it with offset surfaces, some trims, maybe a thicken and a reasonable intuition for how the software and CAD processes work. It doesn’t matter how many surfaces there are. 20 is not a lot, in case you were thinking that.
You might have to do it in pieces. For instance, if the tear drop shape is symmetrical model that as a full shape and shell it, then add back in the bottom neck piece and internal structure
thanks a lot, that is probably the way I will go.
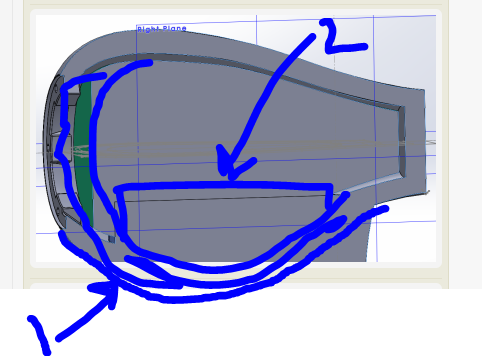
That part marked in orange can be removed with simple extruded cut ,and then everything marked with blue will be a single solid, right?
In real life dimensions for product kinda changes: it is not a final version, and it may change couple times in a week for few weeks now. When you have smth made with “one click button” - it stays 1 button operation but not 20+ surface remake. I am not lazy, I just want to have insurance against such things when 20 operations become 100+ operations and so on.
I am a beginner CAD person, but not a beginner in understanding real life process.
I myself would probably do as TTevolve has stated in his post - “You might have to do it in pieces. For instance, if the tear drop shape is symmetrical model that as a full shape and shell it, then add back in the bottom neck piece and internal structure”
And let me just add this. It doesn’t hurt to ask questions. These guys in here might have 6 ways to get the job done but, most of the time you find something that works for you from among all the ways mentioned.
Here is an example of what I was tlaking about above.
image.png
I made the bulb shape as a revolve and then shelled it, then created a base below and extruded it up to the body
if you do the entire thing as a solid then shell you end up like this
image.png
sometimes order of how you do things is critical.
Thank you.
I am doing exactly that at the moment. Shelling does not work because of the more complex upper “bulb”, but doing by hand is still acceptable. Maybe I will split upper bulb to make it shelled where it is simpler, and another part will do by hand.
If you mean the teeth in a circular pattern, which you show in your first image, then yes they might not shell. I’d get the shell done before applying the teeth.
If it’s not them, the shell feature usually shows what’s causing trouble, and you can add those features after the shell.
Biggest thing in the world of solid modeling is approach it just as you would if you were making the part by hand.
you make shapes and add other shapes and then meld\glue together, just how a woodworker makes stuff.
That’s how us old model makers did it before 3D printers came to be the norm and that is how it made it an easy transition from hand building prototype to building virtual solid prototypes in CAD.
I just had to show a group of students this same concept as you are trying to solve, they made a solid shape then needed to shell then break apart to be able to 3D print , part was to big for our fortus 400 16x14x16 in build area, once broken apart it took 135 hours to grow and took up entire volume of printer. it was a add on propulsion unit for a paddle board, turned out pretty sweet for an 8 week build.
but it is always hard to explain how when it is not in front of us and not having the tree to see what bottle necks were created that may cause failures along the way. sometimes it is better to restart than band aid the current one.