Okay .. have redone the movie (see above) to include what I hope you are looking for ..
ok thank you, that looks nice, so i can probably finish my exact part now (soon) 
i can probably get to the part really soon now, but atm i am even trying to edit/extrude some shapes from a really simple sketch, but it does not even allow me to extrude like a really simple square area from a sketch/face that already has 2 parts extruded from it?
i just get somekind of yellow warning sign saying something, but i dont even know what it wants…
so is there still somekind of really basic tutorial available somewhere that would show how can i extrude many shapes from the same exact sketch? plus it should also cut some of the sketch face that i want to get rid of and dont even want to extrude that one, just to get the actual shape that i’m looking for…
and is there a way to add all new lines and extrusions to 1 and the same sketch to not have to give a new sketch name to every new line that i just added etc? 
Need to know what modeling mode you are in… Synchronous or Ordered?
If you try to extrude the same shape several times, you will end up with solids occupying the same volume which most likely is why you are getting a warning/error.
Assuming an Ordered sketch as Synchronous sketches aren’t a “feature”, you Edit an existing sketch to add/modify elements in it. If you keep hitting the Sketch command every time you want to add to a sketch, you get a new sketch instead.
i probably chose ordered and i only pressed the line or rectangle tool, but i think that i got less sketches when i didnt press the green tick button and just kept adding more lines, altho eventually it probably wanted to end the operation with a new sketch anyway when i wanted to start extruding etc…
and is there even a way to group all of the “sketches” aka lines into 1 single unit/part/feature?
plus i dont even have a clue how can i rotate my newly smashed up part into a new direction, as i kinda need to place the part on it’s different side etc, just to be able to print it on that side later, plus also have new perspective with the “top, side” etc view after the sketches and extrusions have taken a new shape etc…
In ordered mode, SE works a bit different in that it offers two ways to create sketch-based features…
You can draw the sketch as a Profile of the current 3D feature which makes it a private sketch just for that feature and must be edited under that feature.
or
You can create public sketches using the Sketch command and then when you create the 3D feature, you use Select from Sketch to extrude the sketch of your choosing.
it says page not found on that, but now i tried to create an object via the Revolve button and then already found a new problem that i cant even extrude the bottom part of that new revolved object to make it a bit longer than i drew it on the sketch before… plus the “smart dimension” tool does not even give me any option to edit the radius of the object? so why is all of this pro 3d app restricting even the very basic moves that i want to do?
ok now i probably fixed some of the issues by clicking more buttons myself to remove some of the automatic options etc… so now i can check how much progress i can make with this..
Here is the correct link for the tutorials:
https://docs.sw.siemens.com/en-US/doc/246738425/PL20220830878154140.user_interface/xid486886
If you want to move a face then you have to use the command “move face” (in sync you just can click and drag).
In ordered mode you can use “dynamic edit” to be able to drag and see direct end result.
hello again :> i just made some huge progress with another model, but i still dont get it how can i change the properties of the extruded new material after replacing it’s face with another surface… i like the shape of the new face, but i want to change the height of the new object to be less than the 2nd face that i selected…
Its hard to get a grip on what you mean … is it possible to include some picture ?
My general rule (in ordered mode) is that if I need to use commands like move/replace/delete face I’m attacking the problem in the wrong way. In other words redo it from scratch.
So maybe in your case rethink the ordering of the features and what profile shape should go in what feature.
i was basically talking about the thing in your video:
https://www.upload.ee/image/17609096/face1.jpg
the shape of the new face is probably good, but how can i edit(predefine/set) the height(width) of the long wiener to be less(or more) than the surface of the 2nd face where the shape was copied from… i’m not even sure if the diameter of the new face would still come out correct if you select it from a 2nd face, but how would i even extrude the same exact long wiener from the surface if i would also need to copy the shape/roundness of the face where it’s extruded out from in the first place? (if you would rotate the whole model in the video 90 degrees to the left, then the “width” of the wiener would become it’s height etc…) - but the shortest question would probably be - how can i extrude a new rounded face(with a certain height) from a rounded face that is already present on the model? (aka how to even draw something on a rounded face then?)
This “key” is best done with a simple protrusion.
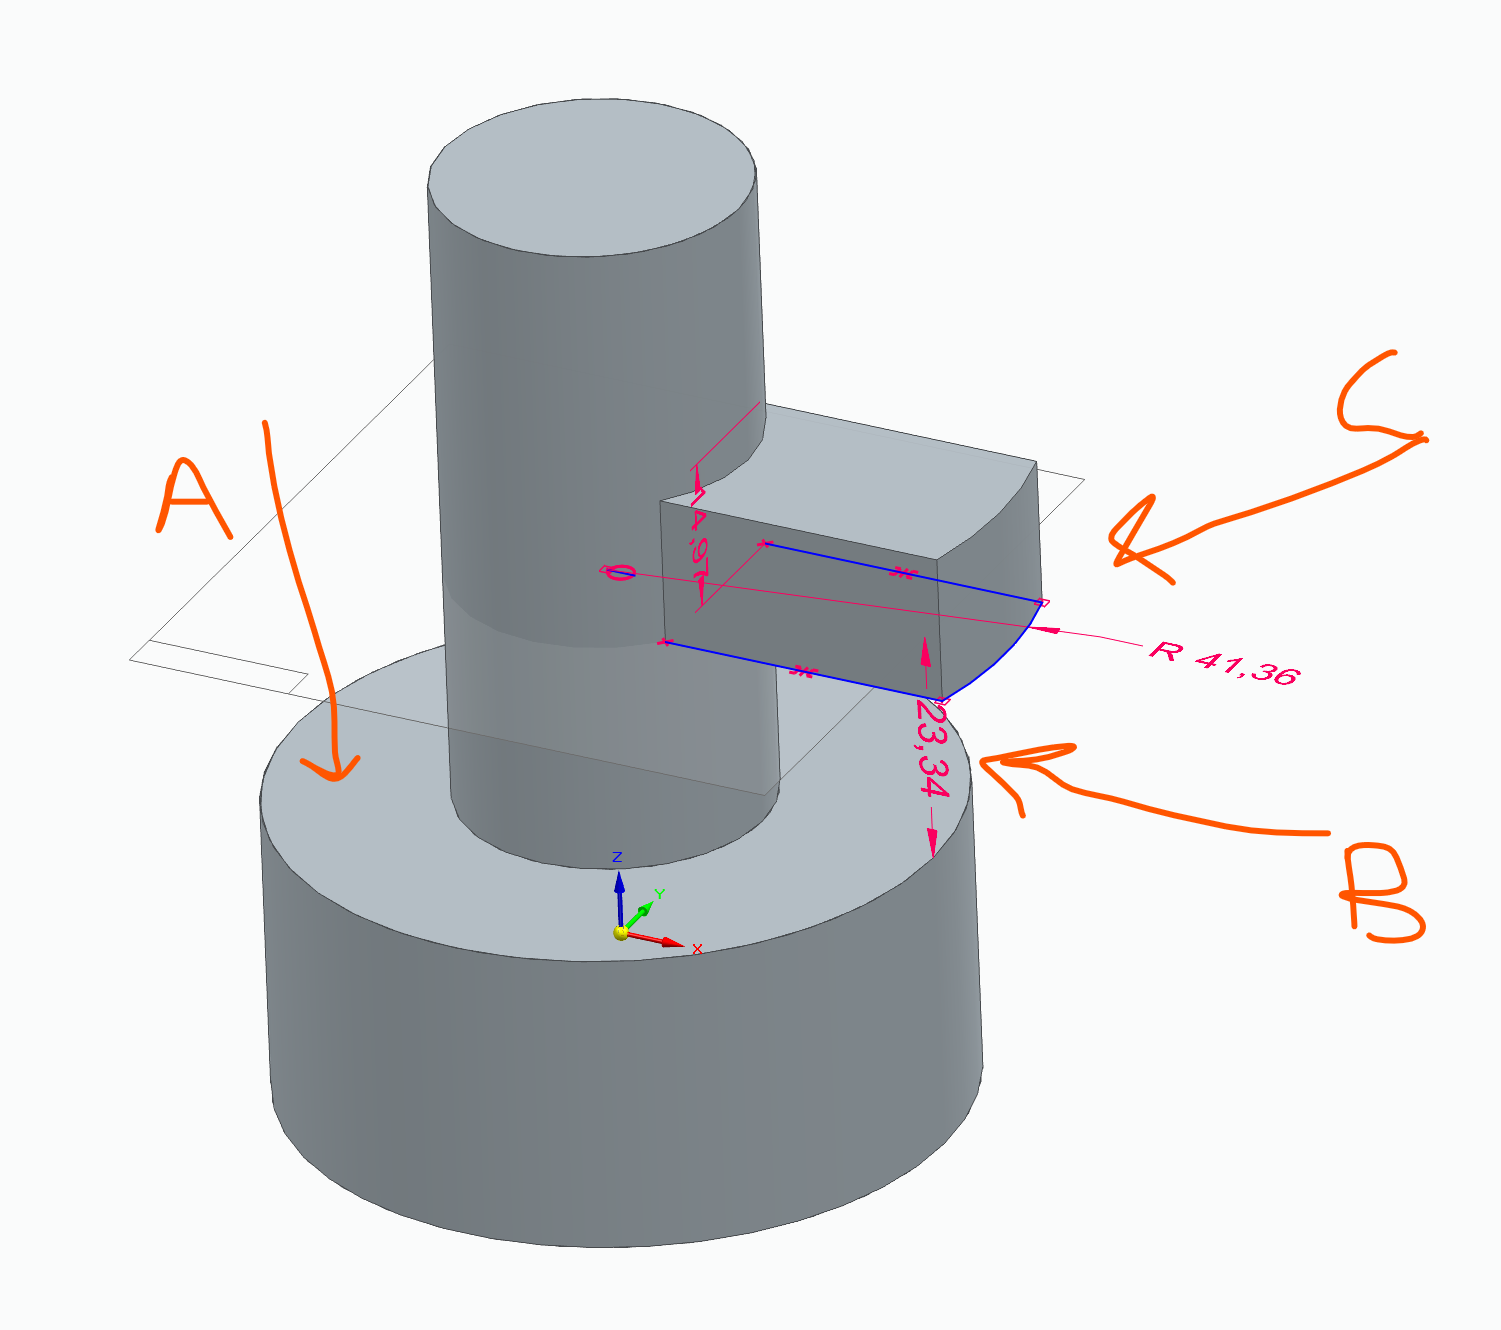
Feature → Protrusion.
Select offset plane and click on surface A.
Adjust the distance to your liking (B).
The just draw your profile (C).
Extrude to your desired thickness.